Viewing 15 posts - 1 through 15 (of 41 total)
  • Author
    Posts
  • #4731
    V8 Staff
    Keymaster

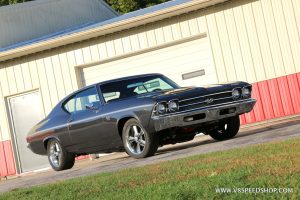
    1969_Chevelle_AT_11.26.14_J_123.JPG

    This 1969 Chevelle was born wearing a Cortez silver paint job and sporting a blue interior. It was an original V8 car, sporting a 307 V8 under the hood and was driven for many many years by its owner Al until the late 80s.

    However, by the late 1980s, the street use took its toll on the Chevelle’s body and chassis, and Al decided it was time to disassemble the car and restore it.

    He disassembled the car in his home garage with the help of his young son, and embarked on a journey to repair the rusty quarter panels as the first steps to bring this car back to life.

    Kevin Oeste

    #4733
    V8 Staff
    Keymaster

    Unfortunately, as many people know, restoring classic muscle car takes time, money, and effort. He had the effort, but raising the family was the obvious priority, so his project speed was set on extra slow. However, Al was able to complete some tasks, including a very good job of installing a pair of original NOS Chevrolet quarter panels on both sides.

    Time passed, the family moved into a bigger house with a bigger garage, and the Chevelle patiently waited for the next stage, which was the engine project.

    The trusty 307 pulled this car over the roads for many years, but Al wanted more, so he and a buddy built a screaming 454 to give this car more go! The engine was built just past LS6 specifications, topped with an aluminum intake and Hooker headers.

    Kevin Oeste

    #4734
    V8 Staff
    Keymaster

    Al build a test stand to break-in his rashly rebuilt engine right there in his garage. This allowed the engine to be ready to fire as soon as the car was finished.

    He found a used 12 bolt rear axle, and had his chassis media blasted and painted and rebuild the front suspension components and bushings to restore the Chevelle’s ride.

    Al pulled the body off the frame to start the chassis restoration. Unfortunately, it was determined that the Chevelle’s cabin floors were hiding more rust and was initially thought.

    Kevin Oeste

    #4735
    V8 Staff
    Keymaster

    Interestingly, the topside it looked okay except for the body mount areas. The bottom side was scaly and Rusty.

    This is when the body came to the V8 Speed & Resto Shop. After our initial inspection, it was determined that the best course of action would be to install a complete cabin and trunk floor from OPGI.

    Kevin Oeste

    #4736
    V8 Staff
    Keymaster

    Our first step was to affix the body on our jig to ensure the floors would go in square and true. Our team use a plasma torch to speed the removal of the original floor.

    The trunk floor was the first section to come out. After it was plasma cut, the crew went back and cleaned up the details around the perimeter where the new floor section would attach.

    Kevin Oeste

    #4756
    V8 Staff
    Keymaster

    At this point, the crew took a slight detour from the floor to install some cowl box replacement panels. These rusted due to leaves and other debris being trapped between the cowl box and the fenders. This is a common occurrence and GM “A” body cars.

    There were sections in the front of the body shell that needed repairing before the new cabin floor could go in. For example, we would be installing a full-length floor that ended at the factory seam at the base of the firewall. Our new floor required to clean sheet metal in the toe board area for proper installation, but the original floor was rusty at this seam. To remedy this, patch sections were ordered welded in place to provide clean sheet metal to attach to the new floor section. Patch panels were ordered from OPGI, cut down, and welded in place.

    Kevin Oeste

    #4757
    V8 Staff
    Keymaster

    Once the toe boards were repaired, the main cabin floor was ready to come out. It looks a little daunting on the jig with absolutely no floor, but the jig legs ensure the shape of the body structure does not change.

    The OPGI floor section runs from the driver toe board all the way to the backseat support. The challenge was not only to change the floors, but also to repair rusty wheel houses without damaging the newly installed quarter panels.

    The body was temporarily removed from the jig so the new floor could be slid in from the bottom, than the body was re-fixtured in proper position.

    Kevin Oeste

    #4758
    V8 Staff
    Keymaster

    Many hours were spent carefully removing and trimming the center floor section. On a GM A body like our Chevelle, the floor is an intricate sandwich of layers, weaving through the rocker panels, floor, and various braces and supports.

    The challenge was not only to change the floors, but also to repair rusty wheel houses without damaging the newly installed quarter panels.

    Plasma cutting the large areas and careful spot will drilling allowed our team to separate the quarter panel from the wheelhouse without causing damage. However, there were areas where we drilled through the quarter panel which would require re-welding after the new wheel houses were installed.

    Kevin Oeste

    #4759
    V8 Staff
    Keymaster

    At this point, we began to mock up and test fit the wheel houses and trunk drop off panels, in addition to test fitting the rear trunk section. This is a tedious process involving installation and removal of these panels multiple times to ensure proper fit. We also installed The main cabin for to make sure it fit properly and harmonious we with our other new sheet metal panels.

    Kevin Oeste

    #4760
    V8 Staff
    Keymaster

    New rear outer wheel houses and trunk drop-off panels were obtained from OPGI and installed. The process involves much test fitting, removal, trimming, and re-fitting to get it all to fit properly. T The panels are then punched with holes for plug welding.

    Once the wells were in place, the trunk floor was trimmed, fitted, and punched with holes in much the same manner.

    The whole assembly of tubs, drops, and floor were clamped in place and test fitted multiple times, then screwed together with sheet metal screws before welding.

    Kevin Oeste

    #4761
    V8 Staff
    Keymaster

    This floor comes with the seatbelt mounts and seat brackets preinstalled, along with brackets for a floor mounted center console.

    Only when all the panels fit properly were they welded together.

    Soon, our body shell was one solid piece again.

    Kevin Oeste

    #4911
    V8 Staff
    Keymaster

    After the floors were complete, we attached the body shell to a rotisserie and sent it out to be media blasted. This revealed more rusty areas around the windows, top of the dash, and the rear package tray. These areas were all repaired with new steel after the shell was coated with a black epoxy primer to prevent rust.

    Kevin Oeste

    #4912
    V8 Staff
    Keymaster

    Next, the body was turned on its side so the bottom of the floors could be seam sealed, painted with an industrial enamel, and then protected with 3M Body Schutz.

    The next phase involved mounting the body onto the chassis that was restored by the owner. We installed new body bushings and hardware, taking time to align everything properly. Our intent was to not remove the body again.

    Kevin Oeste

    #4913
    V8 Staff
    Keymaster

    The Chevelle then re-entered the body shop. After some hammer and dolly work was completed on small dings and dents, the NOS doors and fenders were installed, along with an original GM a hood and tail light packets. The entire car was lightly skim coated with Evercoat Quantum 1 filler to ensure that it would be arrow straight from and to end. The body also was seam sealed to prevent corrosion between panels.

    Kevin Oeste

    #4914
    V8 Staff
    Keymaster

    After the body filler was block sanded smooth, the car received several coats of Evercoat Super Build 4:1 sprayable polyester filler. The car was sprayed with an aerosol black guide coat to illustrate the high and low spots when the sanding process began.

    Kevin Oeste

Viewing 15 posts - 1 through 15 (of 41 total)
  • You must be logged in to reply to this topic.