This cool 1949 Oldsmobile is powered by the original 303 Rocket Oldsmobile V8, but is wearing a smooth custom look with a lowered stance, vintage green exterior, and fully a finished interior. The 1949 Oldsmobile joined Cadillac as the second American automaker to mass produce an overhead valve V8 engine, and this version remained in production until 1953.
Returning The Olds To The Road
The V8 Speed and Resto Shop team aims to make the car more enjoyable to drive all day long, installing power steering, air conditioning, disc brakes, cruise control, tilt wheel, and perhaps some seat upgrades as well. Fuel injection might be in the cards, we’ll post all the pictures and videos here so you can follow the progress of this unique resto-mod street rod… is that a “Street Mod?” Hmmm…
Follow The Upgrades
The V8 Speed and Resto Shop is ready to perform a stock and original restoration or build a high performance restomod just for you. Contact us anytime to chat about your project goals!
Taking a ’68 Coronet 500 to the next level! This episode follows our progress as we transform this classic Mopar muscle car with a meticulous “premium restoration.”
What you’ll see:
Engine bay perfection: Original 383 motor installed and painted in its correct colors.
Award-winning attention to detail: Door jambs, trunk, and fenders get flawless paint that continues under the hood for a truly consistent finish.
Premium touches: We go beyond factory spec with a beautiful metallic green exterior and a tasteful satin green interior (originally from the factory).
Expert Bodywork: Witness the incredible transformation from bare metal to a smooth, flawless finish.
Watch the videos and check out the photos as we transform this cool Coronet!
Recorded at the 2024 Grand National Roadster Show in Pomona, CA
V8’s own Kevin Oeste is honored and excited to join Jeff Smith and Cam Benty on the Car Guy Confessions podcast presented by ARP! Jeff and Cam both have long careers writing Oeste’s favorite car magazines like Hot Rod, Car Craft, Motor Trend, and others. This Podcast shares the story of how Oeste was able to join the ranks at Petersen Publishing and work at Hot Rod along side these two car culture icons. The episode also covers how Oeste met Kelle and they eventually launched V8TV and the V8 Speed and Resto Shop. Thanks to all at Car Guy Confessions for the opportunity for Oeste to join the show! Be sure to like and subscribe for more from our friends at Auto Revolution!
Now Hiring Digital Marketer for Muscle Car Restoration Shop – Full Time
Are you an awesome story teller? We are seeking a talented and creative Digital Marketer to join our team! As a Digital Marketer, you will be responsible for creating compelling content and developing and implementing digital marketing strategies to drive brand awareness. You will work closely with the marketing team to create engaging content, manage social media platforms, and optimize digital campaigns. Help us share cool cars and automotive enthusiast culture!
Digital Marketer Responsibilities Include:
Create compelling stories and content centered around the cars in our shop, the people who own them, and the team renewing them.
Develop awesome marketing and advertising strategies to better position the company in the marketplace and reach target customers
Support marketing executives in organizing various online and in person projects, including speaking engagements, hosting gigs, and other third party productions. Schedule and participate in meetings with outside contacts.
Employ marketing analytics techniques to gather important data (social media, web analytics, rankings etc.)
Daily Marketing Department administrative tasks, calls, follow-up, meetings, etc. as required
Assist in the organizing of promotional events and traditional or digital campaigns and attend them to facilitate their success
Develop campaigns to promote digital media properties – TV / streaming services, video channels, podcasts, websites, social, radio. Communicate with each as needed.
Manage merchandise program including working with designers, 3rd party outsources, website store, promotions
Prepare and deliver promotional presentations
Compose and post online content on the company’s website and social media accounts, including distributing videos to key outlets, manufacturers, customers, and partners; podcast descriptions, keyword phrases, images
Create, analyze, and report on Google Ads campaigns. Make recommendations on campaign demographics and strategies.
Monitor social media posts, provide follow up commentary, identify leads, and promote good will of the shop and V8TV Productions media properties
Coordinate with live events to plan exhibits, collateral material, customer vehicles, promotion of our shop, etc.
Attending selected live events as a representative of our company, both as attendee and exhibitor
Working with manufacturers and distributors to cross promote our shop and media, including working with inside parts team to identify marketing / branding opportunities
Identifying new opportunities to reach new markets, proposing campaigns, implementation
Write marketing and advertising literature (brochures, press releases etc) to augment the company’s presence in the market
Communicate directly with clients and encourage trusting relationships
Reformat existing website / YouTube channel thumbnails, layouts, descriptions to be current and SEO friendly
Coordinate with outside video and audio production customers regarding 3rd party video and podcast production projects, scheduling, booking crews, booking guests, status updates, deliverables, etc.
Monitoring the latest technologies and AI to assist in analysis, content creation, market positioning, effective lead generation
Create partnerships with other content creators to cross promote and grow channels
Create digital newsletters and email blasts
Sharing content with sponsors, vendors, and potential sponsors and advertisers when mentioned
Market employment opportunities for shop
Create and implement PR communication for community involvement (local and industry)
Skills:
Proven experience in Digital Marketing
Graphic Design
Photography
Creative Copywriting
Social Media reporting/analytics
Ability to manage all aspects of events
Good understanding of office management and marketing principles
Demonstrable ability to multi-task and adhere to deadlines
Well-organized with a customer-oriented approach
Good knowledge of market research techniques and databases
Excellent knowledge of Google Apps, marketing computer software and online applications (CRM tools, Online analytics, Google Adwords etc.)
Knowledge of photo editing software (Photoshop preferred)
Video editing skills a plus (Adobe Premiere preferred)
Excellent communication and people skills
High School diploma; BSc in Marketing, Business or relevant field is a strong advantage
Knowledge of enthusiast automotive market is a big plus
Job Type: Full-Time
Salary: Based on experience
Preferred Experience:
Marketing: 3 years (Preferred)
Work Location: Red Bud IL
On site in our place of business, some remote opportunities
We offer a 40 hour work week with optional overtime available. We pay holidays, vacation, and provide health insurance, 401K, life insurance, dental & vision. Excellent opportunities for training and career growth. Great crew to work with. Excellent working environment with an innovative team ready to set your creativity free!
If you have a deep love for classic cars, take pride in your craftsmanship, and possess the skills to bring engines back to life, we want to hear from you! At the V8 Speed and Resto Shop, you’ll have the opportunity to work on remarkable projects and collaborate with fellow automotive enthusiasts.
About The V8 Speed and Resto Shop:
We value the well-being of our Team and their families above all else, and we all focus on generating the best employee and customer experience possible. Our core values center around the way we treat people and would like to be treated. We live and breathe classics, customs, restored and modified muscle cars, restomods, pro-touring cars, and more at the V8 Speed and Resto Shop. We take pride in meticulously restoring and customizing vintage vehicles, and our commitment to craftsmanship and attention to detail sets us apart in the industry. We understand the significance of these cars to their owners and treat them as such. Our team is composed of highly skilled professionals who share a common passion for automotive excellence.
V8 Speed and Resto Shop Purpose:
We believe in the importance of classic vehicles not only as historical objects, but for their personal significance to enthusiasts and their families, and for the joy they bring to the world.
We believe in the importance of the automobile industry as a workspace where people of all skill sets and in all areas of business can thrive working around special vehicles that ignite their passion.
We believe that dream cars can and do exist, and that our team is here to build them.
V8 Speed and Resto Shop Mission Statement:
To connect people with the best times of their lives through things with wheels.
Values Statement:
The V8 Speed and Resto Shop achieves our goals and the goals of our customers by applying the following core values to everything we do:
Happiness
Quality
Respect
Honesty
Loyalty
Teamwork
Passion
Innovation
V8 Speed and Resto Shop Vision Statement:
To ensure that automobile enthusiasts will always have a trusted, talented, and passionate source to provide services they need to enjoy their special vehicles.
To always provide a healthy, safe, creative, and respectful workplace where our team can enhance their skills and abilities and enjoy satisfying and rewarding careers.
The V8 Speed and Resto Shop is a great working environment with awesome teammates and lots of cool tools and equipment to grow your abilities. We have a backlog of work and are always looking to build better, more creative hot rods, customs, and muscle cars. We are located in a small, safe midwestern town of Red Bud Illinois.
If you want consistent, rewarding work every day, every week, building award winning show cars this is a job for you! We are hiring for this Digital Marker job opening now.
Fill Out This Job Application To Schedule An Interview Today!
The V8 Speed and Resto Shop is an Equal Opportunity Employer. The V8 Speed and Resto Shop does not discriminate on the basis of race, religion, color, sex, gender identity, sexual orientation, age, non-disqualifying physical or mental disability, national origin, veteran status or any other basis covered by appropriate law. All employment is decided on the basis of qualifications, merit, and business need.
This sinister black 1930 Ford Model A rumbled in to the V8 Speed and Resto Shop with a few issues like a locked-up steering column. We’re here to help!
V8 Speed and Resto Shop Parts Manager Brian Wibbenmeyer joins Mike “Q-Ball” Clarke and Kevin Oeste on the latest V8 Radio Podcast! Brian and Q are the parts-finding powerhouse that keeps the V8 Speed and Resto Shop rolling, and although we’ve mentioned him on the show before, it was high time to have him as a guest. Brian has lots of great stories from car events, the G-Body life, and even brought some great Automotive Trivia! Get it all in this special episode of the V8 Radio Podcast!
Now Hiring Marketing and Sales Assistant for Muscle Car Restoration Shop – Full Time
We’re looking for a Sales and Marketing Assistant who is a highly motivated, creative individual with experience and a passion for connecting with current and future customers. That passion comes through as she/he engages with customers on a daily basis, with the ultimate goal of building relationships to help with promoting our company in a positive and exciting manner.
This position works with both the Sales and Marketing Teams.
Sales Assistant Responsibilities Include:
Taking calls, providing updates, or messages for sales team
Follow up with sales leads, inquiries, and updates
Scheduling calls and meetings with sales team and technicians
Distributing information to customers and leads
Photos
Inspection results
Video updates
Following up with sales leads in generated on social platforms
Recording notes from technician inspection calls into spreadsheets
Assisting Culture Coordinator with Customer Appreciation Programs
Assisting sales team with correspondence distribution
Marketing Responsibilities Include:
Daily Marketing department administrative tasks
Support marketing executives in organizing various online and in person projects
Assist in the organizing of promotional events and traditional or digital campaigns and attend to them to facilitate their success
Compose and post online content on the company’s website and social media accounts, including distributing videos to key outlets
Working with manufacturers to cross promote
Communicate directly with clients and encourage trusting relationships
Skills:
Proven experience as a marketing assistant
Graphic Design
Photography
Creative Copywriting / Use of AI tools
Social Media reporting/analytics
Ability to manage all aspects of events
Good understanding of office management and marketing principles
Demonstrable ability to multi-task and adhere to deadlines
Well-organized with a customer-oriented approach
Excellent knowledge of Google Apps
Knowledge of photo editing software (Adobe Lightroom preferred)
Excellent communication and people skills
High School diploma; BSc in Marketing, Business or relevant field is a strong advantage
Knowledge of enthusiast automotive market is a big plus
Job Type: Full-Time
Salary: Based on experience
Preferred Experience:
Marketing: 1 year (Preferred)
Work Location: Red Bud IL
On site in our place of business, some remote opportunities
We offer a 40 hour work week with optional overtime available. We pay holidays, vacation, and provide health insurance, 401K, life insurance, dental & vision. Excellent opportunities for training and career growth. Great crew to work with. Excellent working environment with an innovative team ready to set your creativity free!
If you have a deep love for classic cars, take pride in your craftsmanship, and possess the skills to bring engines back to life, we want to hear from you! At the V8 Speed and Resto Shop, you’ll have the opportunity to work on remarkable projects and collaborate with fellow automotive enthusiasts.
About The V8 Speed and Resto Shop:
We value the well-being of our Team and their families above all else, and we all focus on generating the best employee and customer experience possible. Our core values center around the way we treat people and would like to be treated. We live and breathe classics, customs, restored and modified muscle cars, restomods, pro-touring cars, and more at the V8 Speed and Resto Shop. We take pride in meticulously restoring and customizing vintage vehicles, and our commitment to craftsmanship and attention to detail sets us apart in the industry. We understand the significance of these cars to their owners and treat them as such. Our team is composed of highly skilled professionals who share a common passion for automotive excellence.
V8 Speed and Resto Shop Purpose:
We believe in the importance of classic vehicles not only as historical objects, but for their personal significance to enthusiasts and their families, and for the joy they bring to the world.
We believe in the importance of the automobile industry as a workspace where people of all skill sets and in all areas of business can thrive working around special vehicles that ignite their passion.
We believe that dream cars can and do exist, and that our team is here to build them.
V8 Speed and Resto Shop Mission Statement:
To connect people with the best times of their lives through things with wheels.
Values Statement:
The V8 Speed and Resto Shop achieves our goals and the goals of our customers by applying the following core values to everything we do:
Happiness
Quality
Respect
Honesty
Loyalty
Teamwork
Passion
Innovation
V8 Speed and Resto Shop Vision Statement:
To ensure that automobile enthusiasts will always have a trusted, talented, and passionate source to provide services they need to enjoy their special vehicles.
To always provide a healthy, safe, creative, and respectful workplace where our team can enhance their skills and abilities and enjoy satisfying and rewarding careers.
The V8 Speed and Resto Shop is a great working environment with awesome teammates and lots of cool tools and equipment to grow your abilities. We have a backlog of work and are always looking to build better, more creative hot rods, customs, and muscle cars. We are located in a small, safe midwestern town of Red Bud Illinois.
If you want consistent, rewarding work every day, every week, building award winning show cars this is a job for you! We are hiring for this Sales and Marketing Assistant job opening now.
Fill Out This Job Application To Schedule An Interview Today!
The V8 Speed and Resto Shop is an Equal Opportunity Employer. The V8 Speed and Resto Shop does not discriminate on the basis of race, religion, color, sex, gender identity, sexual orientation, age, non-disqualifying physical or mental disability, national origin, veteran status or any other basis covered by appropriate law. All employment is decided on the basis of qualifications, merit, and business need.
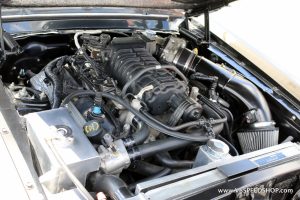
This stunning 1967 Ford Mustang Fastback isn’t your average classic muscle car.
Packing a supercharged 5.4-liter V8 engine from a 2008 Shelby GT500, this restomod is a force to be reckoned with on the road and the track.
Power and Performance Under the Hood
The heart of this beast is the iconic 5.4-liter Shelby GT500 V8 engine, pushing out over 500 horsepower. Paired with a T56 6-speed transmission, this Mustang is built for exhilarating performance.
Check Out The Video!
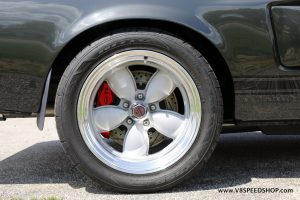
Upgraded Suspension and Brakes for Precision Handling
For superior handling, the suspension system has been completely revamped with Ridetech tubular components and coilover shocks. Four-corner Baer disc brakes provide exceptional stopping power, while American Racing 200S “Daisy” wheels add a touch of classic muscle car style.
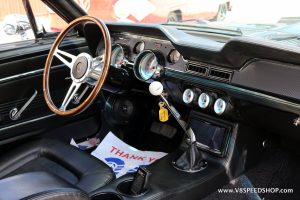
Luxurious Interior with Modern Touches
Step inside the Fastback and you’ll find a custom-crafted interior featuring plush leather-wrapped seats and a custom console. The classic dashboard gets a modern upgrade with Autometer gauges, keeping the driver informed and in control.
Vinyl Wrap Protects the Show-Stopping Finish
One of the most unique features of this Mustang is its exterior. Believe it or not, that stunning finish isn’t paint! The entire car is wrapped in a high-quality vinyl film. This clever choice protects the owner’s investment, allowing them to enjoy pushing this Mustang to its limits on the track without worrying about scratches or damage.
Looking for Classic Car Restoration or Customization?
The V8 Speed & Resto Shop is your one-stop shop for all things classic and muscle car. They offer a full range of services, from routine maintenance to complete frame-off restorations and custom builds. Whether you’re looking to preserve a piece of automotive history or create a one-of-a-kind restomod like this stunning 1967 Mustang, the V8 Speed & Resto Shop has the expertise and passion to bring your vision to life.
Contact The V8 Speed & Resto Shop Today
Let the crew at V8 Speed & Resto Shop turn your dream classic car into reality. Visit their website at https://v8speedshop.com/ or call them at 314-783-8325.
Don’t forget to follow V8 Speed & Resto Shop on social media!
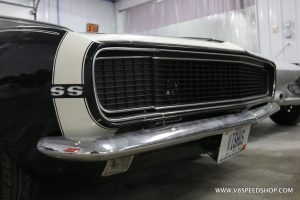
It’s not a Delorean, but this Camaro SS survivor is a time machine.
Nostalgia is a powerful force, and for the owner of this super cool 1967 Chevrolet Camaro, it’s turned up to 11. You see, this is not only a really cool 1967 Camaro, with it’s factory-installed first year 350 V8, Rally Sport (RS) appearance package, and Super Sport (SS) performance goodies, but it’s a valued family member that has returned to the fold.
The Car
When a car arrives at the V8 Speed and Resto Shop, we like to verify it’s identity to see what we’re working with. This time, the VIN and cowl trim tag spell out how this car was built in the first week of November, and was originally painted Butternut Yellow with matching interior and black vinyl top. The RS SS packages are original, as appears the new for 295 horsepower 350 V8 and 4-speed manual transmission installed at the Los Angeles (Van Nuys) CA plant.
The Story
The owner was fortunate to have some great times in the car “back in the day”, as he and his brother would drive it in high school together. As you can imagine, there are many stories about those days. Unfortunately, his brother is no longer with us, and the Camaro got away from the family. However, our customer’s wife eventually located the car, purchased it, and presented it back to the owner for a very special birthday present. We can only imagine the flood of memories and emotions that day when he slid behind the wheel of this treasured Camaro once again.
Check Out The Story In The Video
Next steps for the Camaro SS
After reviewing the condition of the Camaro, the owner determined he needed a hand to get it back on the road. He contacted us at the V8 Speed and Resto Shop to evaluate it’s condition and create a plan that brings the car right back to the condition it was in back in high school… or maybe a bit nicer! Although originally yellow, the owner’s experience and memories are with it in black, so black it should stay. We’ll go over the car and propose a least-invasive restoration and preservation to make it safe, reliable, and ready to burn up the streets once again.
What’s your car’s story?
The V8 Speed and Resto Shop mission statement is to “connect people with the best times of their lives through things with wheels”, and this is a perfect example. We are honored for the opportunity to work on this prized Camaro SS, and fully understand the significance of cars like these… they all have stories, but some are never known. In the end, it’s really all about the people and good times had with the car.
How can we help write your family heirloom Classic or Muscle Car’s next chapter?
The V8 Speed and Resto Shop Team stands at the ready to assist with your classic car’s maintenance, preservation, partial restoration, modification, complete restoration, or even to build a totally custom, bespoke, one-of-a-kind automobile that reflects your desires. Contact us today to start the conversation… we love a great car story!
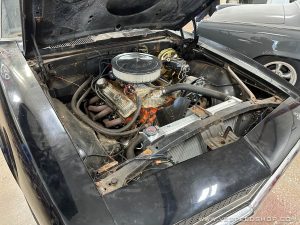
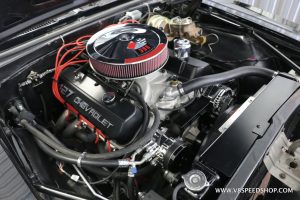
There’s just something about the numbers 427 to a Muscle Car fan.
This very clean 1967 Chevrolet Camaro RS/SS convertible recently came to the V8 Speed and Resto Shop in need of a heart transplant. Although it had a 396 under the hood, it was pretty anemic. Like most of us, the owner wanted more power, so the V8 Speed team upped the ante with a new Chevrolet Performance ZZ427.
427 Cubes of Attitude Adjustment!
This all-new ZZ427 is a 480 horsepower big block Chevy V8, just waiting to transform the Camaro’s personality. A Vintage Air Frontrunner accessory drive and A/C system keep everything cool up front and inside the car, and the V8 crew topped the 427 with a Holley Terminator Stealth EFI system and a slew of other items to make it sing.
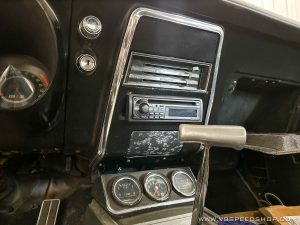
More Sport for the Rally Sport
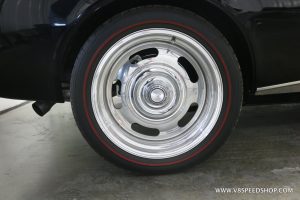
The Camaro is a real RS car, born in the same black exterior and parchment interior colors you see here. It has some cool options, like the rally gauge package in the console and the headrests topping the bucket seats. However, this one is not all stock, by any stretch. In addition to that thumping 427, you’ll find a 5-speed manual transmission in place of the original 4-speed, and tubular suspension and coil-over springs and shocks for better handling. The wheels look right, but they are upsized billet aluminum Chevy Rally style wheels wrapped in custom modern redline tires from Diamondback Classics. These are a great choice for any restomod Camaro.
1967 Chevrolet Camaro Intro Video at V8 Speed and Resto Shop
Hidden In Plain Sight
The Holley Terminator Stealth fuel injection system looks almost exactly like a Holley double pumper carb, but offers better starting, instant response, and modern fuel and timing control that can’t be matched by a carburetor. The 427 utilizes aluminum heads and a full roller cam valvetrain, so the risk of flattening a lobe or trashing a lifter is negated. We always like to build tasteful restomods here at the V8 Speed and Resto Shop. If you’ve got a Camaro or any other Muscle Car that needs some love, we’re happy to chat about it! You can reach us at https://www.v8speedshop.com/contact-us today.
Check Out The Build Photo Gallery of this Sweet 1967 Camaro RS